Step-by-Step Guide: How to Create Simple Nail Designs for Almond Shaped Nails
Almond-shaped nails have taken the beauty world by storm, becoming a favorite among nail enthusiasts worldwide. Why? Their elongated, slimming silhouette is not only flattering on any hand but also provides the perfect canvas for a myriad of nail art designs. Whether you're a seasoned pro or a DIY beginner, almond nails offer endless possibilities for creative expression.
Ready to dip your fingers into the world of almond nail trends? Do you crave the satisfaction of creating your own DIY almond shaped nails designs? Well, you're in the right place! We're about to embark on a journey through a sea of polka dots, stripes, and maybe even some valentine's day inspired designs. All you need is a sprinkle of patience, a dash of creativity, and this step-by-step guide to creating simple nail art designs on almond nails. Ready? Let's dive in!

Creating captivating almond nail designs is an art, and like any great masterpiece, it starts with the right tools. Imagine Michelangelo sculpting David with a butter knife! Nail polish is your paint, providing the base for your canvas. The range of colors and finishes available today make it an exciting time to dive into DIY almond shaped nails. Nail art brushes, your chisels, allow precise application and intricate detail. Dotting tools, the secret weapon of any nail artist, make easy nail art ideas like polka dots or tiny flowers a breeze. And let's not forget the top coat, the protective varnish that seals your design, ensuring your masterpiece withstands the test of time. Ready to explore the world of simple nail arts step by step? Let's get started!
Now that you have your tools and materials ready, let's dive into the process of creating simple yet stunning designs on your almond-shaped nails.


Learn more about Mastering Simple Nail Art for Almond Shaped Nails ✨ or discover other Almond Nail guides.
Voila! You've just created a simple yet stylish nail art design on your almond shaped nails. Let's take a closer look at the process with some step-by-step images.
Now that you've seen the step-by-step process in images, let's watch a video tutorial to further understand the process.
Now that you've seen how to create simple designs on almond shaped nails, let's move on to how to care for and maintain your almond nail designs.
Now that you've mastered the art of creating stunning almond nail designs, let's ensure they stay looking fabulous as long as possible. Remember, maintenance is key! Regularly applying a top coat can significantly prolong the life of your nail art. It's like a protective shield, guarding your masterpiece against chipping and fading.
When it comes to cleaning, be gentle. Harsh chemicals can strip away your design. Opt for a mild, acetone-free nail polish remover when it's time to bid adieu to your art. This will ensure your almond nail trends stay chic, not chipped.
And remember, your nails are jewels, not tools! Use gloves when doing chores to prevent damage. Ready to try out a new easy nail art idea? Follow these tips, and your nails will be ready for their next design adventure!
Now that you know how to create beautiful designs on your almond-shaped nails, let's ensure they last. Here's a checklist of do's and don'ts for maintaining your nail design:
With these maintenance tips in mind, you're ready to explore more design ideas for your almond-shaped nails. Let's get inspired!
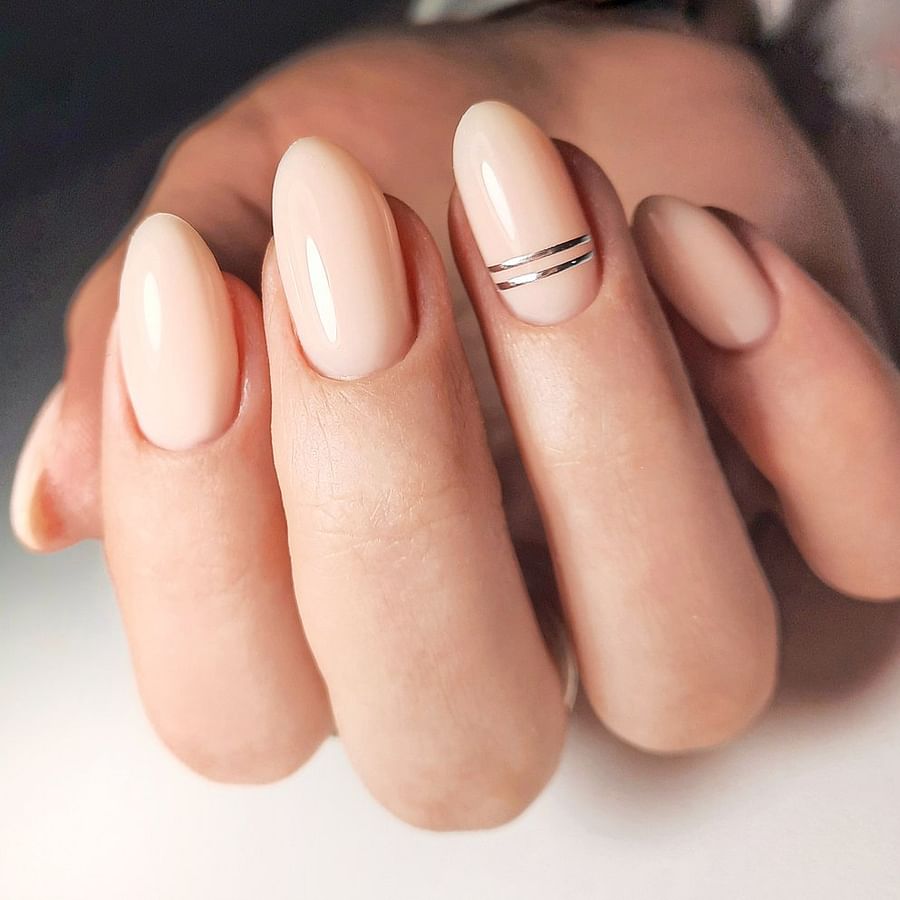
Ready to dip your fingers into the world of nail art for almond nails? Let's explore some easy nail art ideas that will make your almond-shaped nails pop! Consider the timeless elegance of monochrome designs. Black and white never go out of style and can be played up with stripes, polka dots, or even a chic chevron pattern. For a more romantic touch, why not try a simple nail design for Valentine's Day? A soft pink base adorned with tiny hearts can be a sweet surprise for your special someone. Or perhaps you're feeling bold? Then a fiery red with gold accents might be just the ticket. Remember, the key is to let your personality shine through your nails. Need more inspiration? Check out these bold black nail designs for almond shaped nails. And remember, practice makes perfect!
Here are some trendy and simple almond nail design ideas that you can try out for yourself.
These designs are not only chic and stylish but also easy to recreate. Now, let's wrap up everything we've learned in the conclusion.
Bravo, you've journeyed through the realm of almond nail designs, gathering skills and inspiration along the way. From selecting the perfect tools to mastering the art of simple nail designs, you're now a step closer to becoming a nail art connoisseur. Remember, the key lies in practice and creativity.
Almond nail art is not just about aesthetics; it's a statement, a testament to your personality. But what happens after you've won the admiration of your friends? How do you ensure your masterpiece stays fresh and vibrant as the first day? That's where maintenance comes in. It's equally crucial as creating these designs.
Curious about more? Why not explore the festive designs or dive into the sophisticated world of nude nails? The world of almond nail trends is vast and waiting for you to make your mark!
Before we wrap up, let's address some frequently asked questions about almond nail designs, their maintenance, and the tools used.
And that's a wrap! Remember, the world of almond nail designs is vast and waiting for you to make your mark. So, get creative and start designing!

Sierra is a certified nail technician with a deep love for fostering healthy and attractive nails. She is a firm believer in the importance of nail health as an integral part of overall skincare. When she's not working on perfecting her nail art, Sierra finds joy in yoga and meditation.
All Rights Reserved © 2025


Post a comment